Creating and Using Droplets
Droplets allow third-party services to be used with the Fluid platform. Each Droplet is created and maintained by its creator company. Droplets can be used internally by the creator company or can be made available for use by other companies in the Droplet Marketplace.
Creating a Droplet
To create a Droplet, you need to have a Fluid account with access to the Fluid API.
Once you have access to the Fluid API, you can create a Droplet by making a POST request to the /api/droplets endpoint.
A payload for creating a Droplet could look like this:
{
  "droplet": {
    "name": "My Droplet",
    "embed_url": "https://my-company.com/embed",
    "install_webhook_url": "https://my-company.com/webhooks/droplet-installed",
    "uninstall_webhook_url": "https://my-company.com/webhooks/droplet-uninstalled",
    "active": true,
    "settings": {
      "marketplace_page": {
        "title": "My Droplet",
        "summary": "A Droplet for my company",
        "logo_url": "https://my-company.com/logo.svg"
      },
      "details_page": {
        "title": "My Droplet",
        "summary": "A Droplet for my company",
        "logo": "https://my-company.com/big-logo.svg",
        "features": [
          {
            "name": "Feature 1",
            "summary": "Feature 1 summary",
            "details": "Feature 1 details",
            "video_url": "https://my-company.com/feature-1.mp4"
          },
          {
            "name": "Feature 2",
            "summary": "Feature 2 summary",
            "details": "Feature 2 details",
            "image_url": "https://my-company.com/feature-2.svg"
          }
        ]
      }
    }
  }
}
name
The name of the Droplet
embed_url
The URL of the page that will be embedded in the Fluid platform. When a company is using the Droplet, this is the page that will be shown to that company (in an iframe with the company's ID appended to the URL).
install_webhook_url
A URL that Fluid will call when a company installs your Droplet. The webhook is scoped directly to your Droplet, so you only receive events for your specific Droplet. Must use HTTPS in production.
uninstall_webhook_url
A URL that Fluid will call when a company uninstalls your Droplet. Must use HTTPS in production.
active
Whether the Droplet is active and can be used.
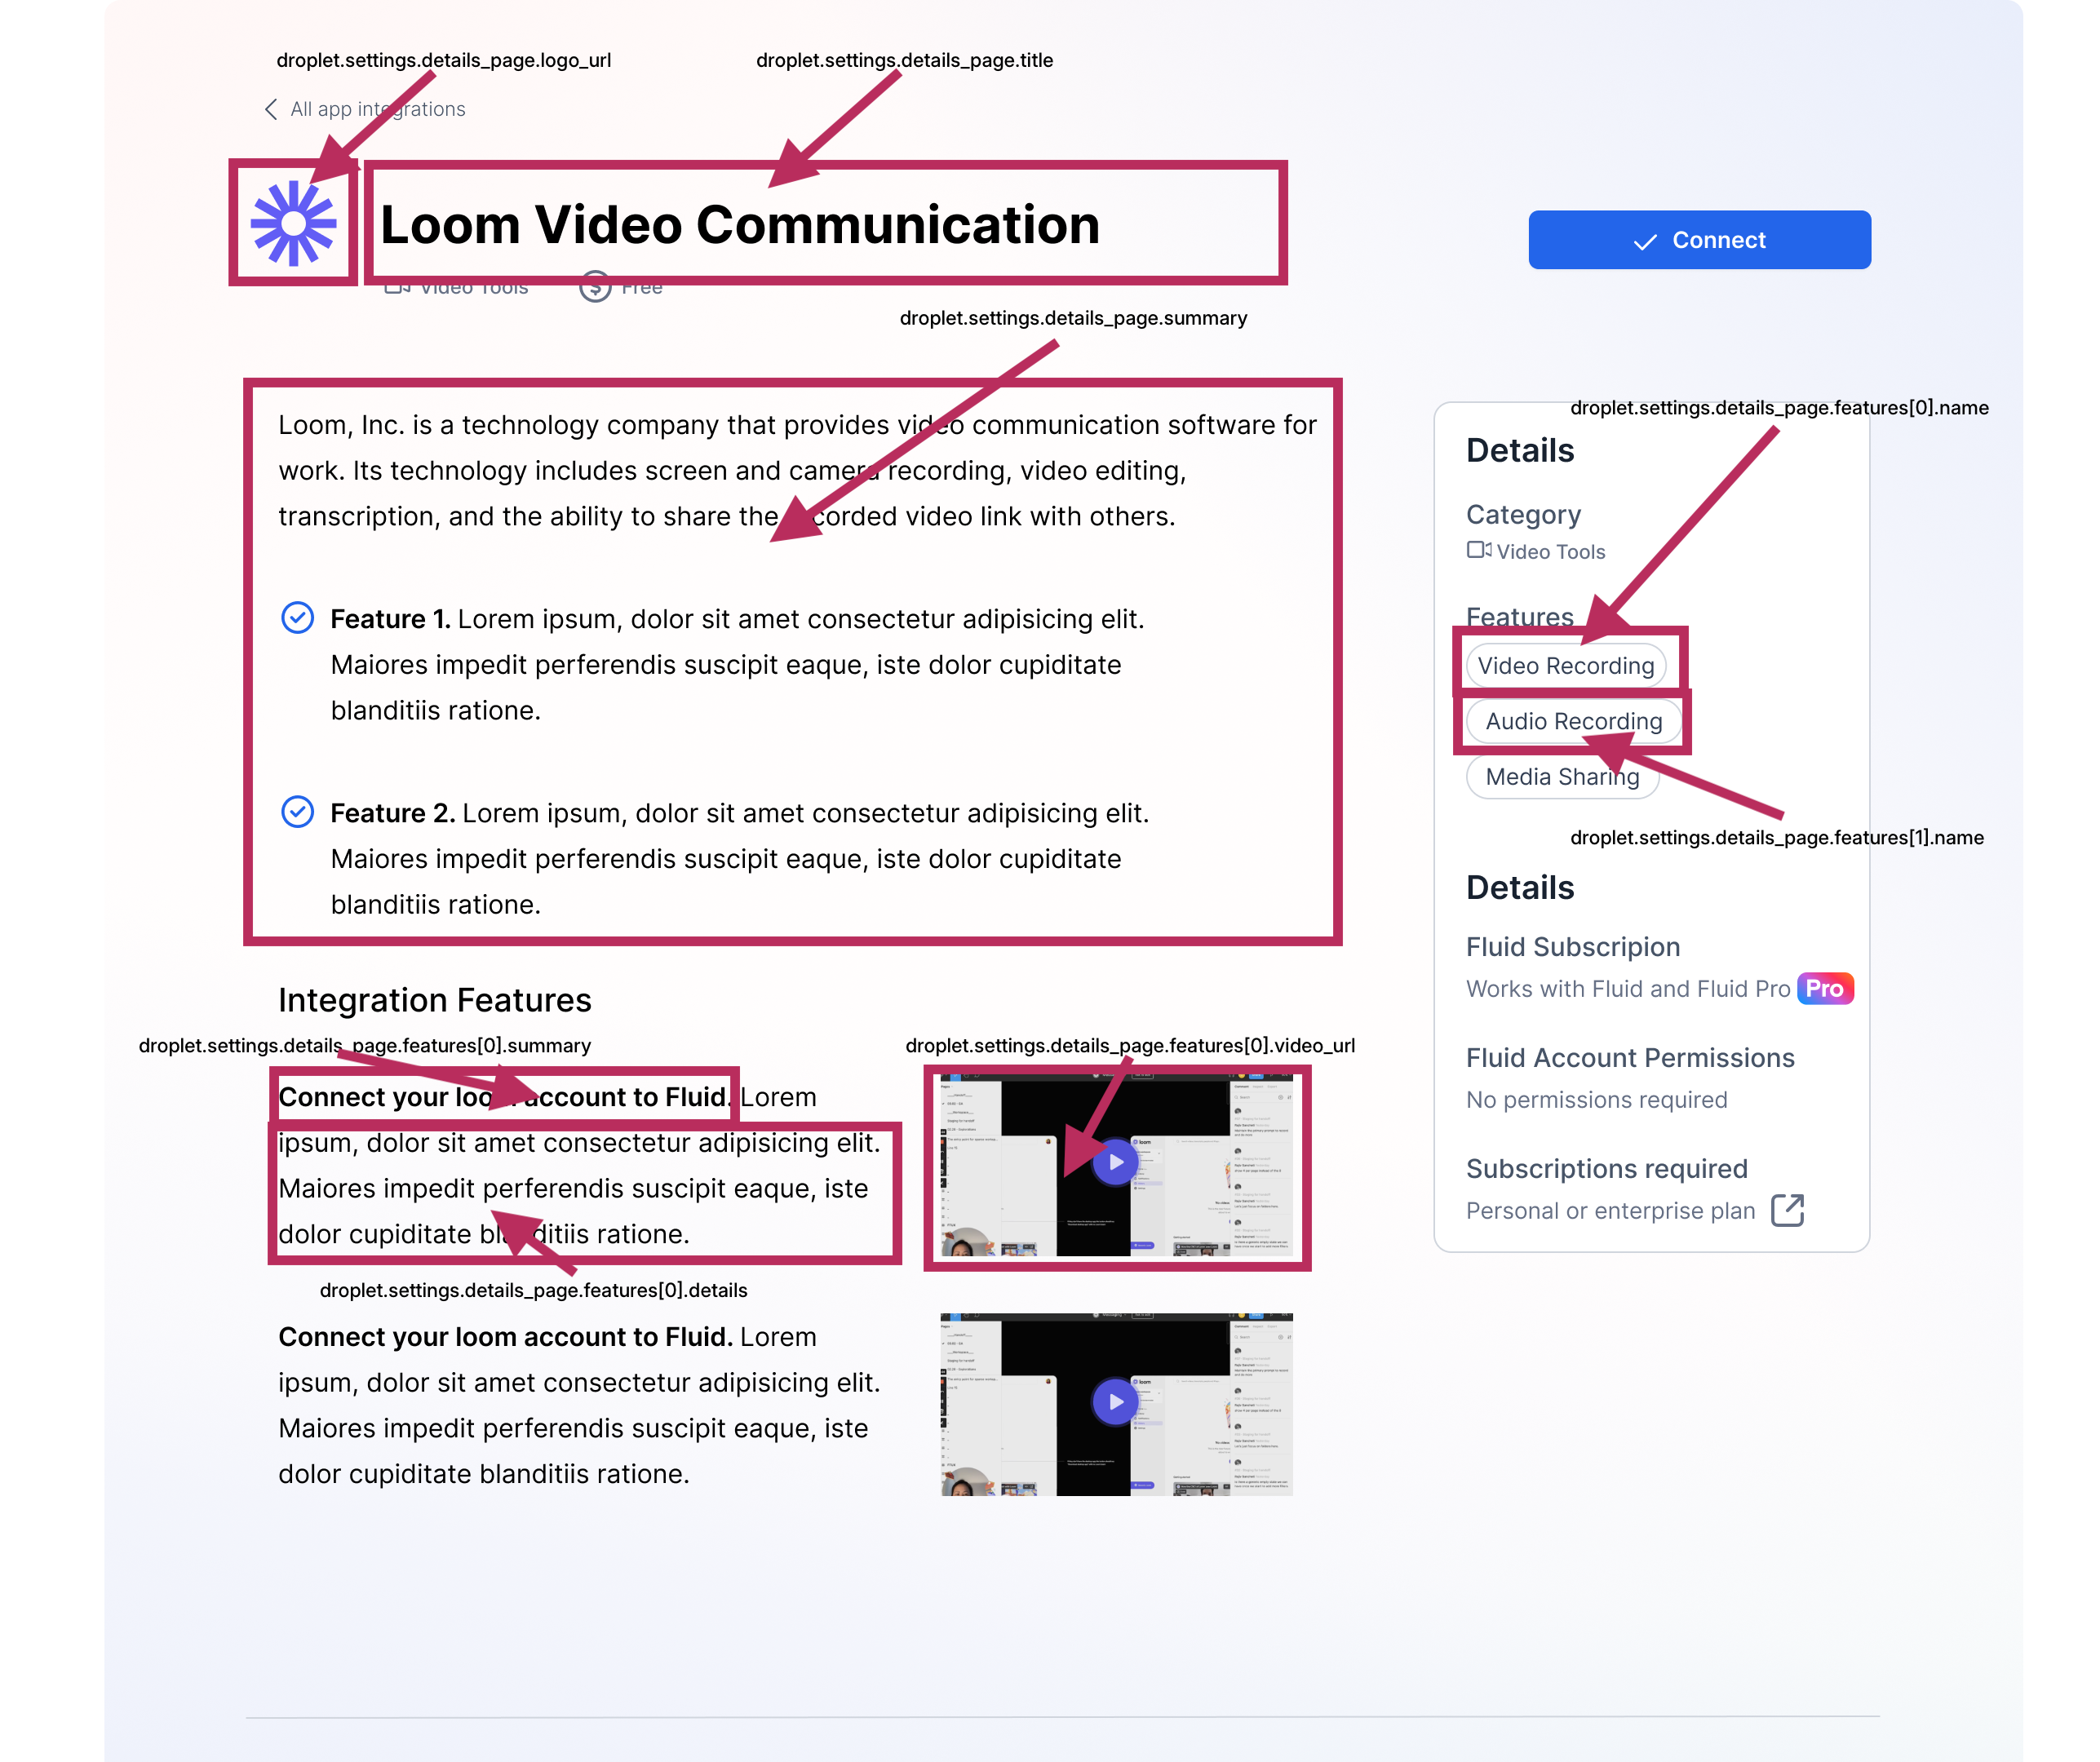
The settings determine how the Droplet will be displayed in the Fluid Marketplace
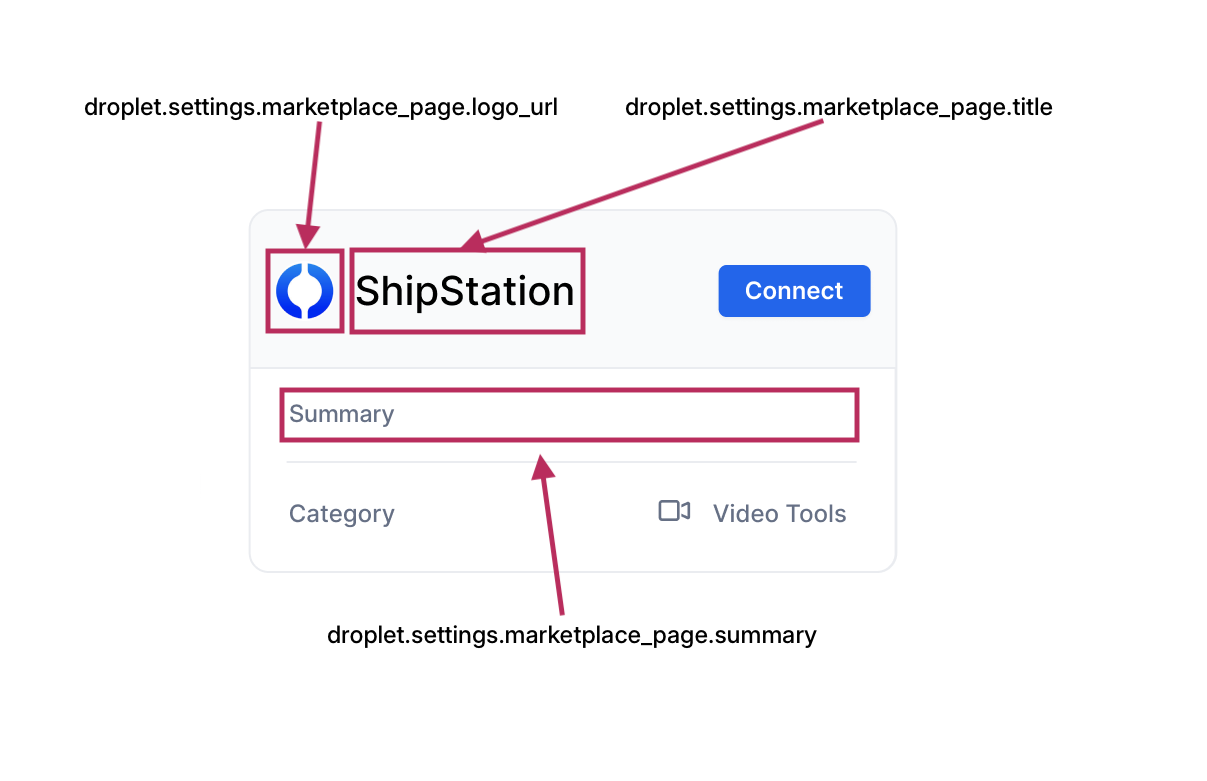
and what its individual details page will look like.
Note: Droplets won't be available in the Marketplace until they are approved by Fluid.
Updating a Droplet
To update a Droplet, you can make a PUT request to the /api/droplets/:droplet_uuid endpoint.
A payload for updating a Droplet could look like this:
{
  "droplet": {
    "name": "My Updated Droplet",
    "embed_url": "https://my-company.com/embed-updated",
    "install_webhook_url": "https://my-company.com/webhooks/v2/droplet-installed",
    "uninstall_webhook_url": "https://my-company.com/webhooks/v2/droplet-uninstalled",
    "active": false,
    "settings": {
      "marketplace_page": {
        "title": "My Updated Droplet",
        "summary": "A Droplet for my company",
        "logo_url": "https://my-company.com/logo.svg"
      },
      "details_page": {
        "title": "My Updated Droplet",
        "summary": "A Droplet for my company",
        "logo": "https://my-company.com/big-logo.svg",
        "features": [
          {
            "name": "Feature 1",
            "summary": "Feature 1 summary",
            "details": "Feature 1 details",
            "image_url": "https://my-company.com/new-feature-1.svg"
          },
          {
            "name": "Feature 2",
            "summary": "Feature 2 summary",
            "details": "Feature 2 details",
            "image_url": "https://my-company.com/new-feature-2.svg"
          }
        ]
      }
    }
  }
}
Note: values that are not provided will be assumed to be null.
Listing Companies Using a Droplet
If you are the owner of a Droplet, you can list the companies using that Droplet with a GET request to the /api/droplets/:droplet_uuid/companies endpoint.
Understanding the Droplet Installation Flow
When companies install your droplet, Fluid uses a secure server-to-server handshake to provide your droplet with API credentials. Your droplet never receives long-lived tokens directly in a webhook — instead, it receives a short-lived exchange token and calls a Fluid endpoint to retrieve its credentials.
Installation Flow Overview
Phase 1: One-Time Setup (Droplet Owner)
As the droplet owner, you configure lifecycle webhook URLs directly on the droplet definition.
Set lifecycle URLs when creating your droplet:
curl -X POST "https://api.fluid.app/api/droplets" \
  -H "Authorization: Bearer YOUR_OWNER_COMPANY_TOKEN" \
  -H "Content-Type: application/json" \
  -d '{
    "droplet": {
      "name": "My Droplet",
      "embed_url": "https://your-droplet.com/embed",
      "install_webhook_url": "https://your-droplet.com/api/webhooks/installed",
      "uninstall_webhook_url": "https://your-droplet.com/api/webhooks/uninstalled"
    }
  }'
Or add them to an existing droplet via update:
curl -X PUT "https://api.fluid.app/api/droplets/YOUR_DROPLET_UUID" \
  -H "Authorization: Bearer YOUR_OWNER_COMPANY_TOKEN" \
  -H "Content-Type: application/json" \
  -d '{
    "droplet": {
      "install_webhook_url": "https://your-droplet.com/api/webhooks/installed",
      "uninstall_webhook_url": "https://your-droplet.com/api/webhooks/uninstalled"
    }
  }'
Note: Lifecycle webhook URLs must use HTTPS in production. When a company installs or uninstalls your droplet, Fluid will call the configured URL directly — only YOUR droplet's URL is called, not every webhook registered on your account.
Phase 2: Per-Installation Flow (Each Installing Company)
When any company installs your droplet, a two-step handshake occurs:
Step 1: Fluid sends a signed webhook to your install_webhook_url
{
  "resource": "droplet",
  "event": "installed",
  "company": {
    "droplet_installation_uuid": "dri_abc123def456",
    "droplet_uuid": "drp_xyz789",
    "fluid_company_id": 123,
    "fluid_shop": "company.fluid.app",
    "name": "Installing Company Name",
    "credentials": {
      "exchange_token": "dex_a1b2c3d4e5f6...",
      "exchange_token_expires_at": "2026-03-11T12:10:00Z",
      "exchange_endpoint": "/api/droplet_installations/exchange"
    }
  }
}
The webhook includes three signed headers for verification:
X-Fluid-Shop— the shop identifierX-Fluid-Timestamp— when the request was signedX-Fluid-Signature— HMAC-SHA256 signature computed overtimestamp.bodyusing your droplet's webhook secret
Important: The
exchange_tokenis short-lived (10 minutes) and single-use. Your droplet must exchange it for a long-livedauthentication_tokenpromptly.
Step 2: Your droplet calls the exchange endpoint
Using the exchange_token from the webhook, make a server-to-server call to Fluid:
curl -X POST "https://api.fluid.app/api/droplet_installations/exchange" \
  -H "Content-Type: application/json" \
  -d '{
    "exchange_token": "dex_a1b2c3d4e5f6..."
  }'
Response:
{
  "droplet_installation": {
    "droplet_installation_uuid": "dri_abc123def456",
    "droplet_uuid": "drp_xyz789",
    "fluid_company_id": 123,
    "fluid_shop": "company.fluid.app"
  },
  "credentials": {
    "authentication_token": "dit_xyz789...",
    "webhook_verification_token": "wvt_abc123...",
    "issued_at": "2026-03-11T12:00:05Z",
    "token_type": "bearer"
  }
}
The exchange endpoint returns:
authentication_token— a long-lived token (prefix:dit_) to act on behalf of this companywebhook_verification_token— token used to verify HMAC signatures on incoming webhooks (prefix:wvt_)droplet_installation_uuid— the unique installation identifierfluid_company_id— the company's unique ID in Fluidfluid_shop— the company's shop identifier
Exchange token rules:
- Single-use — a second call with the same token returns
410 Gone - Expires after 10 minutes — expired tokens return
410 Gone - Invalid tokens return
404 Not Found
Step 3: Your droplet stores the credentials and sets up resources
After a successful exchange, your droplet should:
- Store the
authentication_token,webhook_verification_token, and company details in your database - Mark the company as active/installed
- Optionally register company-specific webhooks using the token
- Optionally create drop zones or other resources for this company
Example: Registering company-specific webhooks
Using the authentication_token from the exchange, you can register webhooks specific to this company:
curl -X POST "https://api.fluid.app/api/company/webhooks" \
  -H "Authorization: Bearer dit_xyz789..." \
  -H "Content-Type: application/json" \
  -d '{
    "webhook": {
      "resource": "order",
      "event": "created",
      "url": "https://your-droplet.com/api/webhooks/company-123",
      "http_method": "post"
    }
  }'
Now your droplet will receive order.created events for this specific company.
Phase 3: Uninstallation Flow
When a company uninstalls your droplet, Fluid sends a signed webhook to your uninstall_webhook_url:
{
  "resource": "droplet",
  "event": "uninstalled",
  "company": {
    "droplet_installation_uuid": "dri_abc123def456",
    "droplet_uuid": "drp_xyz789",
    "fluid_company_id": 123,
    "fluid_shop": "company.fluid.app"
  }
}
Your droplet should:
- Mark the company as inactive in your database
- Clean up any company-specific resources
- Discard the stored
authentication_token(it will be revoked)
Verifying Webhook Signatures
All lifecycle webhooks from Fluid are signed using HMAC-SHA256. You should verify the signature to ensure the webhook is authentic.
Headers included with every webhook:
X-Fluid-Shop— the shop identifierX-Fluid-Timestamp— Unix timestamp when the request was signedX-Fluid-Signature— the HMAC-SHA256 signature
Verification steps:
- Reject the request if the timestamp is more than 5 minutes old (prevents replay attacks)
- Compute the HMAC:
HMAC-SHA256(webhook_secret, "#{timestamp}.#{raw_body}") - Compare the computed signature with
X-Fluid-Signatureusing a constant-time comparison - Reject if signatures do not match
Example (Ruby):
def verify_webhook(request, webhook_secret)
  timestamp = request.headers["X-Fluid-Timestamp"]
  signature = request.headers["X-Fluid-Signature"]
  body = request.body.read

  # Reject stale requests
  return false if Time.now.to_i - timestamp.to_i > 300

  expected = OpenSSL::HMAC.hexdigest("SHA256", webhook_secret, "#{timestamp}.#{body}")
  ActiveSupport::SecurityUtils.secure_compare(expected, signature)
end
Example (Node.js / Express):
const crypto = require('crypto');
const express = require('express');
const app = express();

// Preserve the raw request body for signature verification
app.use(express.json({
  verify: (req, _res, buf) => { req.rawBody = buf; }
}));

function verifyWebhook(req, webhookSecret) {
  const timestamp = req.headers['x-fluid-timestamp'];
  const signature = req.headers['x-fluid-signature'];
  const body = req.rawBody;

  // Reject stale requests
  if (Math.floor(Date.now() / 1000) - parseInt(timestamp) > 300) {
    return false;
  }

  const expected = crypto
    .createHmac('sha256', webhookSecret)
    .update(`${timestamp}.${body}`)
    .digest('hex');

  return crypto.timingSafeEqual(Buffer.from(expected), Buffer.from(signature));
}
Authenticating as a Company Using a Droplet
A DropletInstallation represents a company's use of a Droplet. It is created when a Company installs a Droplet.
Your droplet receives its authentication_token through the install handshake described above. This token allows your droplet to make API calls on behalf of the installing company.
When using the API, authenticate using the Authorization header with the value Bearer <authentication_token>, e.g. Authorization: Bearer dit_12s34b5f678d90.
You can view installation metadata (but not credentials) with a GET request to the /api/droplet_installations/:uuid endpoint.
Token Scopes (Authorization Restrictions)
Droplet installation tokens can be restricted to specific resource categories using scopes. This follows the principle of least privilege — a droplet that only needs to read products shouldn't have access to orders or payment data.
How Scopes Work
Each droplet installation token has a scopes field that controls which API resources it can access:
- All scopes (default): When no scopes are specified during installation, the token inherits the droplet's
requested_scopes(which defaults to all available scopes), granting access to all resources the token's role permits. - Restricted array: The token can only access resources within the listed scope categories. Requests to resources outside the granted scopes receive a
403 Forbiddenresponse. - Empty array (
[]): The token has no scope access and all scoped API calls will return403 Forbidden.
Available Scopes
| Scope | Description |
|---|---|
main | Core company resources |
prospects | Prospect/lead management |
members | Member management |
web | Web/storefront resources |
settings | Company configuration |
products | Product catalog |
orders | Order management |
users | User management |
website | Website pages and content |
header_menus | Navigation menus |
payments | Payment processing |
Each scope maps to a group of related API resources. For example, the products scope grants access to products, variants, categories, and other product-related endpoints.
Setting Scopes on Installation
You can set scopes when a company installs your droplet via the API:
curl -X POST "https://api.fluid.app/api/droplet_installations" \
  -H "Authorization: Bearer YOUR_ADMIN_TOKEN" \
  -H "Content-Type: application/json" \
  -d '{
    "droplet_uuid": "drp_your_droplet_uuid",
    "scopes": ["products", "orders"]
  }'
The response includes both the stored scopes and the effective_scopes:
{
  "droplet_installation": {
    "uuid": "dri_abc123...",
    "droplet_uuid": "drp_xyz789...",
    "active": true,
    "scopes": ["products", "orders"],
    "effective_scopes": ["products", "orders"],
    "created_at": "2026-02-25T12:00:00Z"
  }
}
If no scopes are provided during installation, the installation inherits the droplet's requested_scopes (which defaults to all available scopes):
{
  "droplet_installation": {
    "scopes": ["main", "prospects", "members", "web", "settings", "products", "orders", "users", "website", "header_menus", "payments"],
    "effective_scopes": ["main", "prospects", "members", "web", "settings", "products", "orders", "users", "website", "header_menus", "payments"]
  }
}
Updating Scopes
Restrict or expand an existing installation's scopes with a PUT request:
# Restrict to only products and orders
curl -X PUT "https://api.fluid.app/api/droplet_installations/dri_abc123" \
  -H "Authorization: Bearer YOUR_ADMIN_TOKEN" \
  -H "Content-Type: application/json" \
  -d '{
    "droplet_installation": {
      "active": true,
      "scopes": ["products", "orders"]
    }
  }'
# Grant all scopes (unrestricted access)
curl -X PUT "https://api.fluid.app/api/droplet_installations/dri_abc123" \
  -H "Authorization: Bearer YOUR_ADMIN_TOKEN" \
  -H "Content-Type: application/json" \
  -d '{
    "droplet_installation": {
      "active": true,
      "scopes": ["main", "prospects", "members", "web", "settings", "products", "orders", "users", "website", "header_menus", "payments"]
    }
  }'
Scope Enforcement Behavior
When a droplet token makes an API request:
- If the endpoint has no permission declaration — the request proceeds (unregistered endpoints are not scope-gated).
- If the endpoint's resource falls within a granted scope — the request proceeds.
- Otherwise — the request is rejected with
403 Forbidden:
{
  "error": "Token does not have the required scope: products"
}
Note: Scopes are checked in addition to role-based permissions. A token must have both the correct scope AND the correct role permission to access an endpoint. Scopes provide a coarse-grained outer boundary; the role's JSONB permissions provide fine-grained control within that boundary.
Best Practices for Scopes
- Request only what you need: When installing a droplet, specify the minimum set of scopes required for its functionality.
- Grant all scopes sparingly: Listing all scopes is convenient during development but should be narrowed in production.
- Scopes must be an array: The
scopesfield must always be an array of strings (e.g.,["products", "orders"]). Passingnullor non-string values will return a422 Unprocessable Entityerror. - Scope validation: The API validates scope values on create and update. Invalid scope names return a
422 Unprocessable Entityerror.
Identifying Which Company is Using Your Droplet
When a company accesses your droplet through the Fluid interface, you need to identify which company is making the request. Fluid provides company context through URL parameters.
The DRI (Droplet Request Identifier) Parameter
When your droplet's embed_url is loaded in the Fluid interface, Fluid automatically appends a dri (Droplet Request Identifier) parameter:
Your configured embed_url:
https://your-droplet.com/embed
Actual URL loaded by Fluid:
https://your-droplet.com/embed?dri=abc123xyz789
The dri parameter is a unique identifier that maps to a specific DropletInstallation. You can use it to:
- Look up the company in your database (you stored this during installation)
- Retrieve the authentication token for this company
- Make API calls on behalf of this company
- Load company-specific settings and data
Example flow:
1. Extract dri from request: ?dri=abc123xyz789
2. Query your database: SELECT * FROM companies WHERE droplet_installation_uuid = 'abc123xyz789'
3. Retrieve: company_id, authentication_token, settings
4. Use authentication_token to call Fluid API for this specific company
This pattern allows your droplet to serve multiple companies from a single service, with proper data isolation and authentication for each.
Creating Drop Zones from Your Droplet
Drop zones allow you to embed content from your droplet directly into specific locations within the Fluid interface (e.g., checkout page, product page). Your droplet can automatically create drop zones during installation.
What are Drop Zones?
Drop zones are embedded iframes that appear in predefined locations throughout the Fluid interface. Common locations include:
above_fast_checkout- Above the checkout buttonbelow_product_details- Below product informationcart_sidebar- In the shopping cart- And more (see Drop Zone Documentation)
Local Development and Testing
When developing your droplet locally, you need a way to receive webhooks from Fluid. Using a tunneling service like ngrok allows you to expose your local development server to the internet.
Setting Up ngrok for Droplet Development
1. Install ngrok:
# Linux/WSL
sudo snap install ngrok

# macOS
brew install ngrok

# Windows
# Download from https://ngrok.com/download
2. Start your local droplet server:
# Your development server on port 3000, 3002, etc.
npm run dev
# or
python manage.py runserver
# or whatever your stack uses
3. Start ngrok tunnel:
ngrok http 3000
4. Copy the HTTPS URL from ngrok:
Forwarding https://abc123.ngrok.io -> http://localhost:3000
5. Update your droplet's lifecycle URLs to point to ngrok:
curl -X PUT "https://api.fluid.app/api/droplets/YOUR_DROPLET_UUID" \
  -H "Authorization: Bearer YOUR_OWNER_COMPANY_TOKEN" \
  -H "Content-Type: application/json" \
  -d '{
    "droplet": {
      "install_webhook_url": "https://abc123.ngrok.io/api/webhooks/installed",
      "uninstall_webhook_url": "https://abc123.ngrok.io/api/webhooks/uninstalled"
    }
  }'
6. Test installation:
- Install your droplet through the Fluid interface
- Watch webhook arrive in your local server
- Exchange the token for credentials
- View requests in ngrok inspector:
http://localhost:4040
ngrok Best Practices
- Use authtoken for persistent URLs across restarts (get from ngrok dashboard)
- Inspect traffic at
http://localhost:4040to see all webhook payloads - Replay requests from the ngrok inspector for rapid testing
- Update lifecycle URLs on your droplet when your ngrok URL changes
- Use https URLs only - Fluid requires secure webhook endpoints
Alternative: Local Testing Without ngrok
If you prefer not to use ngrok, you can:
- Deploy to a staging environment and test there
- Use webhook forwarding services like webhook.site or requestbin
- Mock webhook payloads in your tests (see example webhooks above)
Best Practices for Building Droplets
Data Management
- Store company data: Always persist company details and authentication tokens after the exchange handshake
- Isolate company data: Ensure each company's data is properly isolated in your database
- Clean up on uninstall: Remove company data and delete drop zones when processing uninstall webhooks
Authentication
- Exchange tokens promptly: The exchange token expires in 10 minutes and is single-use
- Secure tokens: Store the long-lived
authentication_tokensecurely (encrypted at rest) - Use company tokens: Always use the company-specific
authentication_tokenwhen making API calls on their behalf - Never share tokens: Each company's token should only be used for that company's operations
Webhooks
- Verify signatures: Always verify the
X-Fluid-Signatureheader on incoming webhooks - Handle idempotency: Webhooks may be delivered multiple times — ensure your handlers can process the same event safely
- Respond quickly: Return a 2xx status within 30 seconds to acknowledge receipt
Error Handling
- Graceful degradation: If your droplet service is down, it shouldn't break the company's Fluid experience
- Retry logic: Implement retry with exponential backoff when calling Fluid APIs
- Monitor health: Set up monitoring and alerting for your droplet service
Development Workflow
- Develop locally with ngrok for rapid iteration
- Test the full handshake — install, exchange token, make API calls, uninstall
- Monitor production webhooks and API calls
Quick Start Checklist
When building a new droplet, follow this checklist:
- Create droplet via API or Fluid interface
- Configure
embed_urlfor your droplet's main UI - Configure
install_webhook_urlanduninstall_webhook_url - Implement install webhook handler to:
- Verify the webhook signature
- Extract the
exchange_tokenfrom the payload - Call
POST /api/droplet_installations/exchangewith the token - Store the returned
authentication_token,webhook_verification_token, and company details - Create any necessary drop zones
- Register company-specific webhooks (if needed)
- Implement uninstall webhook handler to:
- Verify the webhook signature
- Mark company as inactive
- Clean up resources and discard stored tokens
- Handle DRI parameter in your embed URL to identify company context
- Test locally with ngrok (optional)
- Deploy to production
- Submit for marketplace approval (if making publicly available)
Additional Resources
- Webhooks Guide - Complete webhook documentation
- Drop Zone External Usage - Drop zone integration details
- Fluid API Reference - Full API documentation
- Authentication Guide - Authentication patterns and best practices